How to Load a Cordless Grease Gun
Here's how to load a grease gun: disconnect power, retract the follower, insert a compatible cartridge, reassemble, and prime until grease flows steadily. Use your model's manual for cartridge orientation, pressure relief, and the release sequence.
On this page (8 sections)
- What do you need to load a grease gun?
- How to load a grease gun step by step
- How do you prime a cordless grease gun after loading?
- How do you know the grease gun is ready to use?
- Which grease cartridge should you choose?
- Which loading mistakes stop grease from flowing?
- How should you clean and store a loaded grease gun?
- Which setup should you choose for easier loading?
Here's how to load a grease gun: disconnect power, retract the follower, insert the correct cartridge, reassemble, and prime until grease flows steadily. Your tool's manual sets the exact order for pressure relief, cartridge seals, and follower release.
Loading and priming are separate jobs. A full barrel won't feed the pump if air blocks the grease path or the follower remains locked back.
What do you need to load a grease gun?
You need a compatible cartridge, clean rags, a waste container, and your gun's manual. Check the equipment's grease requirements before opening a tube.
Wipe dirt from the barrel joint before separating it. Keep the open cartridge and gun head away from grit, which can enter the grease path during loading.
Check the cartridge's size and condition, too. A crushed tube or damaged rim may prevent it from seating correctly.
The Ultra Heavy Duty Red Grease, 2-Pack suits owners who regularly service equipment that calls for its grease specification. AtomLube identifies it as NLGI #2 lithium grease and states that it meets the GC-LB classification for automotive wheel bearing and chassis applications.
Choose this pack when you can use the same approved grease across recurring jobs. Skip it if your equipment needs another grade or grease type; red color doesn't guarantee compatibility.
For the steps after loading, see how to use a grease gun on a Zerk fitting.
How to load a grease gun step by step
Load with power disconnected, then prime only after the barrel is assembled correctly. These steps cover common cartridge-fed cordless guns; follow your manual wherever its sequence differs.
- Remove the battery and relieve pressure. Follow the gun's pressure-relief procedure before opening any part of the grease path.
- Clean and remove the barrel. Wipe the joint, then separate the barrel from the head as directed.
- Retract and secure the follower. Pull the plunger rod back and engage its catch if fitted, keeping fingers clear of the spring-loaded mechanism.
- Remove the empty cartridge. Check that no old sleeve, cap, or seal remains inside.
- Insert the new cartridge. On common plastic-cap and pull-tab tubes, remove the plastic cap and insert that open end first.
- Remove the remaining seal. Take off the pull-tab before reconnecting the head, using the cartridge and tool instructions to confirm the order.
- Reassemble and release the follower. Start the threads straight and follow the manual's tightening and release sequence.
- Prime the gun. Reconnect power when directed and clear air until grease flows steadily into a suitable waste container.
Don't force a cartridge or barrel that won't seat. Check for the wrong tube size, leftover packaging, or crossed threads before trying again.
How do you load a grease cartridge without trapping air?
Seat the cartridge fully and make sure the follower can feed grease toward the pump. The follower is the spring-loaded part behind the grease; its rod position and release method vary by gun.
Don't assume pushing the rod inward releases the follower on every model. Follow the specified catch, twist, or release steps rather than copying another brand's method.
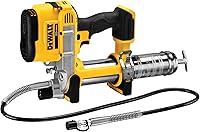
The DeWalt DCGG571B has an air-bleeder valve for cartridge changes, a variable-speed trigger, and a 42 in flexible hose. Its integrated foot lets you rest the gun on a flat surface while positioning the hose.
This tool suits frequent maintenance work where controlled trigger input and hose reach matter, especially if you already use compatible DeWalt batteries. It's a tool-only model, so account for a compatible battery and charger if you're starting fresh.
Skip a cordless upgrade if your current gun handles a few accessible fittings comfortably. If loading repeatedly leaves a dry outlet, see why a cordless grease gun may not pump before replacing it.
How do you prime a cordless grease gun after loading?
Use the model's priming procedure until the outlet delivers a steady flow without repeated air gaps. Keep the coupler disconnected from equipment so you can confirm grease delivery first.
Direct the outlet into a suitable waste container with your hands and body clear. Operate the air bleeder only as instructed, and never loosen the barrel or hose under pressure.
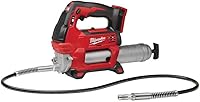
The Milwaukee 2646-20 offers an air-bleeder valve, 2 speeds, and a preset grease counter. Its 48 in hose suits fittings that require more reach, while markings on the plunger rod help gauge the grease remaining.
Choose it for repeated service rounds where speed selection and a grease counter fit your routine. The counter helps control dispensing, but the equipment manual still determines how much grease each point needs.
Skip this bare tool if you need a complete setup with a battery and charger included. For loading details, read how to load a Milwaukee grease gun, or follow how to prime a DeWalt grease gun for that model.
What if grease comes out in spurts?
Repeat the approved priming procedure if flow keeps breaking into air gaps. Brief spurts can occur while trapped air clears, but continued sputtering means the gun isn't ready for service.
Stop prolonged trigger use with a dry outlet. Disconnect power and relieve pressure before checking the cartridge, follower, and barrel connection.
How do you know the grease gun is ready to use?
The gun is ready when grease flows consistently and the assembled tool shows no leaks. Release the trigger before attaching the coupler to a clean fitting.
Inspect the hose and coupler for damage before starting. Never use a finger to find a leak; high-pressure grease can penetrate skin, and an injection injury needs immediate medical care.
Hold the coupler square to the fitting and apply the amount specified for the equipment. Don't pump until grease escapes everywhere, since excess grease can damage some seals and boots.
Read how to use a grease gun on a Zerk fitting for coupling and removal steps. A blocked fitting calls for diagnosis, not a longer trigger pull.
Which grease cartridge should you choose?
Match the equipment's grease specification first, then match the cartridge to the gun. NLGI grade describes consistency; it doesn't identify every property or prove that 2 greases can be mixed.
Check requirements for the thickener type, application, and operating conditions. If the grease already in the machine is unknown, establish what it needs before adding another type.
The Lucas Oil Lithium Grease Tube, 14 oz suits compatible agricultural, automotive, and industrial service. Lucas describes its Red “N” Tacky grease as water resistant, with rust and oxidation inhibitors and a long storage life.
Choose it for occasional maintenance when those properties match the machine's requirements. Skip it when the equipment specifies a different lubricant, regardless of whether the cartridge fits.
Label guns by grease type if you maintain machines with different needs. A dedicated gun for each incompatible grease helps prevent mix-ups during busy service rounds.
For the tool-side loading sequence, see how to load a Milwaukee grease gun. If you're choosing your first tool, how to choose a cordless grease gun explains the main buying decisions.
Which loading mistakes stop grease from flowing?
Check the cartridge seals, follower release, and assembly before assuming the motor has failed. Small loading errors can leave a powered gun unable to draw grease.
- A seal remains attached: remove all required caps and seals in the correct order.
- The follower stays locked back: release it using the gun's specified method.
- The cartridge won't seat: check size, direction, and tube damage instead of forcing it.
- The barrel starts crooked: separate it and restart the threads straight with power disconnected.
- The pump keeps drawing air: repeat the approved priming steps rather than running the motor continuously.
Disconnect power and relieve pressure before correcting any of these faults. Don't open a pressurized connection to chase an air pocket.
Use why a cordless grease gun may not pump if those checks don't restore flow. A persistent blockage or leak needs the manufacturer's service guidance.
How should you clean and store a loaded grease gun?
Relieve pressure as directed, disconnect power, and wipe away exposed grease before storage. Clean around the coupler and barrel joint without pushing dirt into openings.
Use the gun's hose holder or protective cap if fitted. Store spare cartridges sealed, protected from dirt, and according to their instructions.
Keep a simple record of the grease type loaded in each gun. That avoids guessing at the next service and helps you reorder the correct cartridge.
Which setup should you choose for easier loading?
Keep a working gun and buy the correct grease unless your service routine justifies a tool upgrade. Learning how to load a grease gun starts with cartridge fit, follower release, and priming.
Choose AtomLube for recurring compatible wheel bearing and chassis work, or Lucas for compatible maintenance where water resistance and storage life matter. Neither choice overrides the equipment's lubricant requirements.
Choose the DeWalt for variable trigger control and a stable resting foot, or the Milwaukee for speed selection and its preset counter. An existing compatible battery system can make either bare tool the more practical choice.
Once loading is complete and flow is steady, follow how to use a grease gun on a Zerk fitting to grease each service point correctly.
Frequently asked questions
How do you load a cordless grease gun?
Disconnect power, relieve pressure, retract and secure the follower, and insert the correct cartridge before reassembling the gun. Follow your model's instructions for removing seals and releasing the follower.
Reconnect power when ready to prime, then direct the outlet into a waste container until grease flows steadily.
Which end of a grease cartridge goes in first?
For a common cartridge with a removable plastic cap and a pull-tab seal, the plastic-cap end usually enters the barrel first after its cap is removed. Remove the pull-tab before attaching the head.
Confirm this sequence in your gun and cartridge instructions because cartridge designs and loading methods vary.
Why won't my cordless grease gun prime after loading?
Trapped air, an unreleased follower, or a cartridge that isn't seated correctly can stop the pump from drawing grease. Disconnect power and relieve pressure before checking the assembly.
Use the model's air-bleeder or priming procedure, and stop prolonged trigger use if the outlet stays dry.
Can you use any grease cartridge in a cordless grease gun?
No. The cartridge must fit the gun, and the grease must meet the equipment maker's requirements for grade, type, and application.
A tube that fits can still hold the wrong lubricant.
Don't mix greases unless their manufacturers confirm compatibility, and follow the required changeover procedure when switching types.