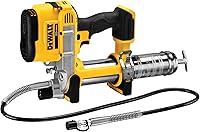
How to Prime a DeWalt Grease Gun
To prime a DeWalt grease gun, load the cartridge correctly, use the air-bleeder procedure in your model's manual, and check for steady grease flow before connecting to a fitting. Remove the battery before checking loading or assembly.
On this page (8 sections)
- How do you prime a DeWalt grease gun?
- What should you check before priming?
- Which DeWalt grease gun should you choose?
- Why does a DeWalt grease gun need priming?
- What if the gun still won't pump after priming?
- Which grease should you load?
- Which mistakes cause repeat priming problems?
- How do you know priming is complete, and what comes next?
To prime a DeWalt grease gun, load the cartridge correctly, clear trapped air using your model's air-bleeder procedure, and confirm steady grease flow before connecting to a fitting. Remove the battery before checking cartridge loading or barrel assembly.
Priming restores the grease feed after air enters during a cartridge change. It won't correct an empty tube, a blocked fitting, or the wrong grease for your equipment.
How do you prime a DeWalt grease gun?
Start with correct loading and the manual's air-bleeder sequence, then check discharge with the hose disconnected from equipment. The DCGG571M1 and DCGG571B both have an air-bleeder valve to assist with priming after cartridge changes.
Use this checklist alongside your model's instructions:
- Remove the battery. Set the gun on a stable surface and keep the coupler clear of dirt.
- Check the cartridge installation. Confirm that its closures were removed and that the barrel and follower are arranged as the manual requires.
- Follow the air-bleeder procedure. Use the specified valve position and sequence; don't assume the trigger should run while the valve is open.
- Prepare a safe discharge area. Point the hose away from people and follow the manual's method for catching waste grease.
- Install the battery when directed. Perform the prescribed flow check and look for continuous grease delivery.
- Finish the procedure. Return the valve and other parts to their operating positions before attaching the coupler.
These guns can deliver up to 10,000 PSI, so never check discharge or leaks with your fingers. Don't hold a rag against the coupler while operating the gun.
How to prime a DeWalt grease gun after a cartridge change
Check the new cartridge installation before repeating the priming cycle. A partly removed seal or an incorrectly positioned follower needs a loading correction, not more trigger time.
Grease left inside the hose can emerge briefly even if the pump isn't receiving a steady supply. Look for sustained flow during the prescribed check, rather than stopping at the first small amount.
What should you check before priming?
Check grease choice, cartridge seating, and barrel assembly with the battery removed. Our guide to how to load a cordless grease gun explains the general loading process if you're starting with an empty barrel.
Wipe loose dirt from around the barrel connection before opening it. Keep removed parts on a clean surface so grit doesn't enter with the new cartridge.
Confirm that the cartridge is the right size for the gun and contains the grease your equipment requires. Check the follower position against the manual, particularly if the gun has previously been used with a different loading method.
Inspect the hose and coupler for visible damage before reinstalling the battery. Replace damaged parts through the proper service procedure rather than using a flow check to investigate a suspected leak.
Arrange a waste container where you can see the discharge without reaching toward it. Keep dirt, loose cloth, and your hands away from the hose opening.
Which DeWalt grease gun should you choose?
Choose the DCGG571M1 kit if you need a battery and charger, or the DCGG571B tool-only model if you already have compatible ones. Priming features don't separate these choices because both include an air-bleeder valve.
Both models offer a variable speed trigger, a 42-inch flexible hose, and an LED for dark work areas. Their pumps deliver up to 5 oz/min, so use controlled trigger input when a fitting needs only a small amount.
DCGG571M1: for buyers starting a battery setup
The kit suits someone adding a cordless grease gun without an existing compatible battery and charger. Having those items included keeps the buying decision focused on the gun and the grease your equipment needs.
Its pump filter screen helps keep dirt from clogging the pump mechanism. Clean loading still matters because a filter doesn't make dirty cartridges or contaminated grease acceptable.
Skip this package if its battery and charger would duplicate a suitable setup you already own. You don't need the kit simply because you're learning to prime the gun.
DCGG571B: for buyers with compatible batteries
The tool-only model suits an established DeWalt battery setup, provided your battery and charger are compatible. It includes a shoulder strap for carrying the tool between service points.
Skip it if you need a complete starting package and haven't accounted for the battery and charger. The full DeWalt DCGG571B grease gun review gives more context for that choice.
For broader help deciding whether this tool category fits your maintenance work, read how to choose a cordless grease gun.
Why does a DeWalt grease gun need priming?
Air interrupts the feed of grease into the pump, especially after opening the barrel for a cartridge change. Priming clears that interruption so grease can move through the hose consistently.
Think of priming as restoring the supply path, not increasing pressure. Holding the trigger longer won't correct every cause of poor delivery.
Pay attention to when flow stops. Failure immediately after a reload points you toward loading and trapped air, while a problem that appears only at one fitting calls for a different check.
What if the gun still won't pump after priming?
Stop and separate a feed problem from a fitting problem before repeating the procedure. Whether grease flows with the coupler disconnected helps you choose the next troubleshooting step.
If no grease emerges during the manual's flow check, remove the battery and recheck the cartridge, follower, barrel assembly, and bleeder position. Also confirm that the cartridge contains grease and the battery is ready for use.
If grease flows freely before connection but won't enter one fitting, don't keep adding trigger pressure. Check the coupler connection and the equipment's lubrication instructions before treating the gun as the cause.
Our guide to why a cordless grease gun may not be pumping covers the broader fault checks. Consult DeWalt support if correct loading and the prescribed priming procedure don't restore delivery.
Don't loosen the hose, coupler, or other connections to vent air or pressure unless the manual directs that procedure. Remove the battery and follow the specified pressure-release steps before any work on the grease path.
Once flow is established, how to use a grease gun on a Zerk fitting explains the general connection process. If you maintain another brand as well, keep its procedure separate; our guide to loading a Milwaukee grease gun covers that setup.
Which grease should you load?
Use the grease type and grade required by the equipment, including its rules for mixing with grease already inside. Cartridge size alone doesn't guarantee suitability.
AtomLube Ultra Heavy Duty Red Grease comes as two 14 oz tubes of NLGI #2 grease. AtomLube identifies it as meeting the GC-LB performance classification for automotive wheel bearing and chassis applications.
This pack suits planned maintenance where those requirements match the machine. Skip it if the equipment calls for another grade or chemistry, or if you can't confirm compatibility with the existing lubricant.
Don't choose grease by color alone. Record what you load, and label the gun if you keep multiple grease types so the next cartridge change doesn't introduce an accidental mix.
Which mistakes cause repeat priming problems?
Dirty loading, incomplete setup, and treating every stoppage as trapped air can turn one cartridge change into repeated troubleshooting. Correct the cause before repeating the same steps.
- Leaving a cartridge closure in place: Check both ends during loading so grease can feed as intended.
- Changing several parts at once: Work through the manual's checks in order so you can identify the cause.
- Loosening the barrel as a shortcut: Use only the assembly position and air-release method specified for your model.
- Running the gun indefinitely: Stop when the prescribed procedure fails and move to troubleshooting.
- Using a fitting as the priming check: Establish flow before connecting, so you don't confuse a fitting restriction with a feed problem.
After use, wipe grease and dirt from the coupler exterior and store the hose end clean. Follow the manual's storage guidance, and keep spare cartridges sealed until needed.
How do you know priming is complete, and what comes next?
Steady flow during the manual's discharge check shows that the grease feed has been restored. Complete the valve-setting steps before attaching the hose to equipment.
Knowing how to prime a DeWalt grease gun also means knowing when to stop troubleshooting. If it still won't deliver after correct loading and the prescribed procedure, seek service guidance before buying a replacement.
Choose the M1 kit when you need the battery and charger, or the B model when your compatible setup is ready. Choose grease by the machine's requirements, then follow how to use a grease gun for the next step at the fitting.
Frequently asked questions
How do you prime a DeWalt grease gun?
Load the cartridge correctly, follow your model's air-bleeder procedure, and check for steady grease flow before connecting to a fitting. Remove the battery before inspecting the barrel or cartridge; use the manual for valve position and trigger timing, since the presence of a bleeder valve doesn't guarantee the operating sequence.
Why won't my DeWalt grease gun prime?
Trapped air, an empty cartridge, or incorrect loading can interrupt grease delivery; remove the battery and check the cartridge, barrel assembly, and follower setup against your model's manual. If the prescribed priming steps don't restore flow, stop and use DeWalt's troubleshooting guidance rather than loosening pressurized connections.
Do you need to prime a DeWalt grease gun after changing cartridges?
Follow your model's priming instructions after a cartridge change, especially if grease doesn't flow steadily; a new cartridge can leave air in the feed path even when grease remains in the hose. Complete the required flow check before attaching the coupler, rather than assuming that leftover grease proves the pump is ready.